How to Mine Ethereum Classic (ETC) with Antminer E9 Pro
If you are here, this is because you want to upgrade your mining performances on ETC right? Well, the best hardware to do so is the Bitmain Antminer E9 Pro. This powerful ASIC miner is designed to efficiently mine cryptocurrencies like Ethereum Classic. In this comprehensive guide, we’ll walk you through the step-by-step process of setting up your Antminer E9 Pro for optimal mining performance using the best ETC mining pool. Whether you’re a seasoned miner or just getting started, this article will provide you with all the essential information you need to configure your mining rig successfully.
Table of contents
Getting Started: Unboxing and Setup the Antminer E9 Pro
When you receive your Bitmain Antminer E9 Pro, you’ll find it securely packed in a foam-lined box, ensuring safe delivery. Upon opening the box, you’ll be greeted by the impressive size and weight of the E9 Pro. Keep in mind that due to its size and weight, you might want a friend’s assistance while transporting it to your mining location.
Choosing the Right Environment: Power and Network Requirements
Before diving into the setup process, ensure that you have the right environment for your Antminer E9 Pro. This ASIC miner draws around 2200 Watts of power, making it essential to have a suitable electrical setup. For North American users, a 200 to 250-volt circuit is recommended. It’s important to note that a standard 110 or 120-volt circuit will not provide sufficient power for the E9 Pro. Consult a certified electrician to determine your power requirements and make any necessary modifications.
In addition to power considerations, ensure you have a stable internet connection using an Ethernet cable, as the Antminer E9 Pro doesn’t support Wi-Fi connectivity.
Step-by-Step Setup Guide
Step 1: Physical Setup
- Connect the Antminer E9 Pro to an appropriate power supply.
- Connect the miner to your network router using an RJ45 network cable.
Step 2: Finding the IP Address
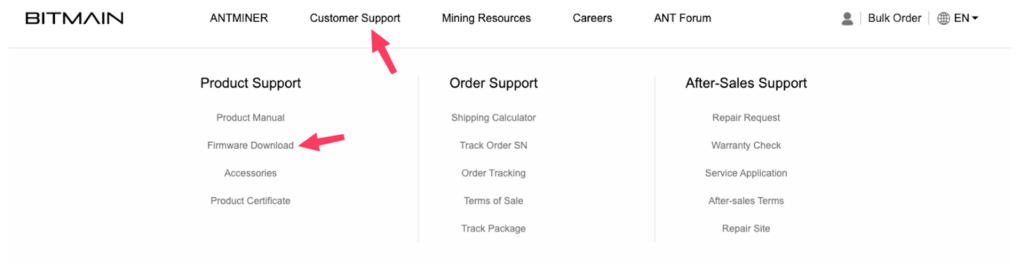
- Visit the official Bitmain website, navigate to “Customer Support,” and then access the “Firmware Download” section.
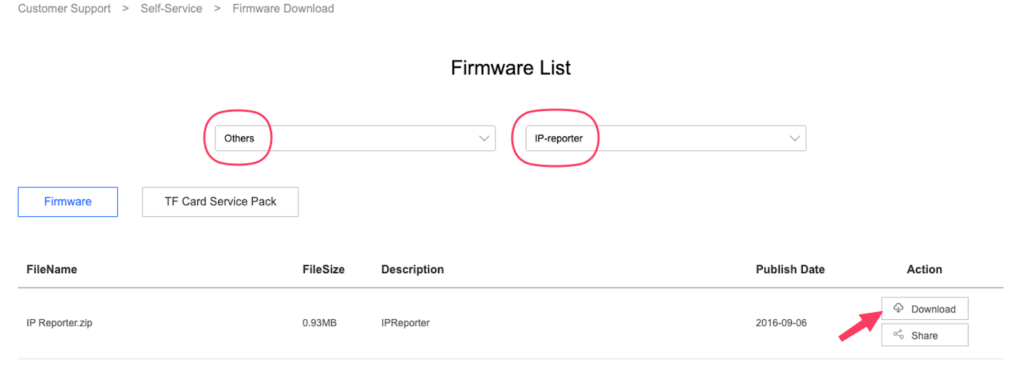
- Under the “Firmware list” section, choose “Others” from the left-hand side, and then opt for “IP Reporter” on the right-hand side.
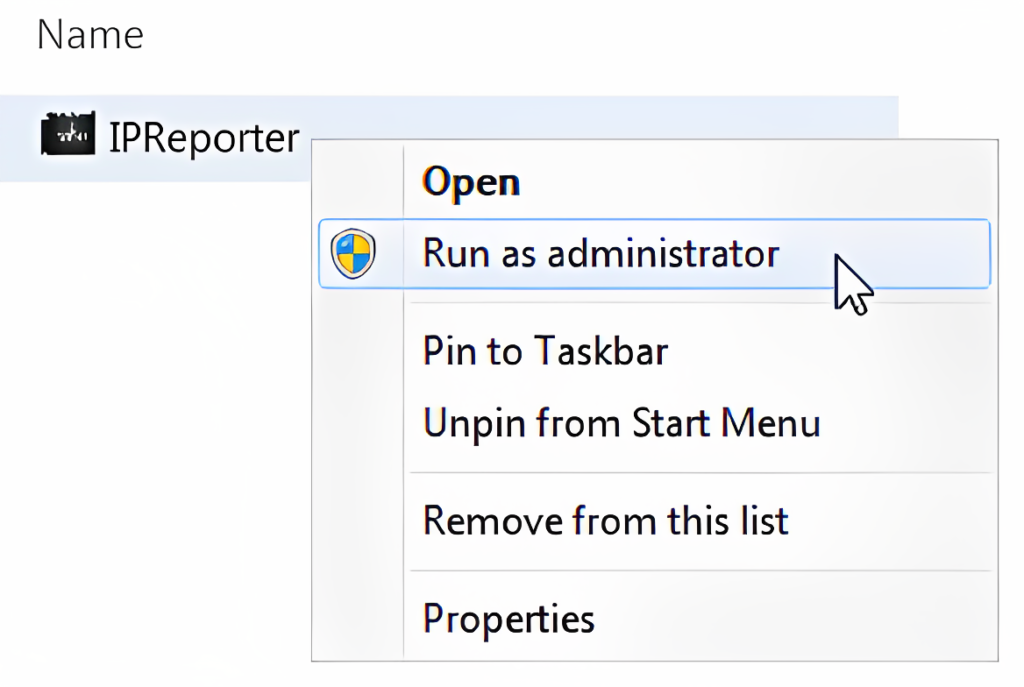
- Unzip the file and run it as administrator.
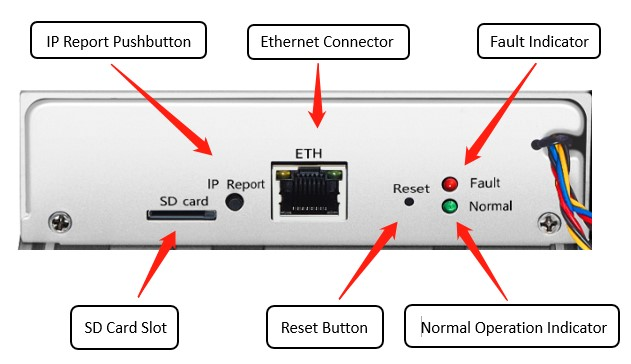
- Press and hold the “IP Report” button, situated next to the Ethernet port on your physical ASIC, for a duration of 5 seconds.
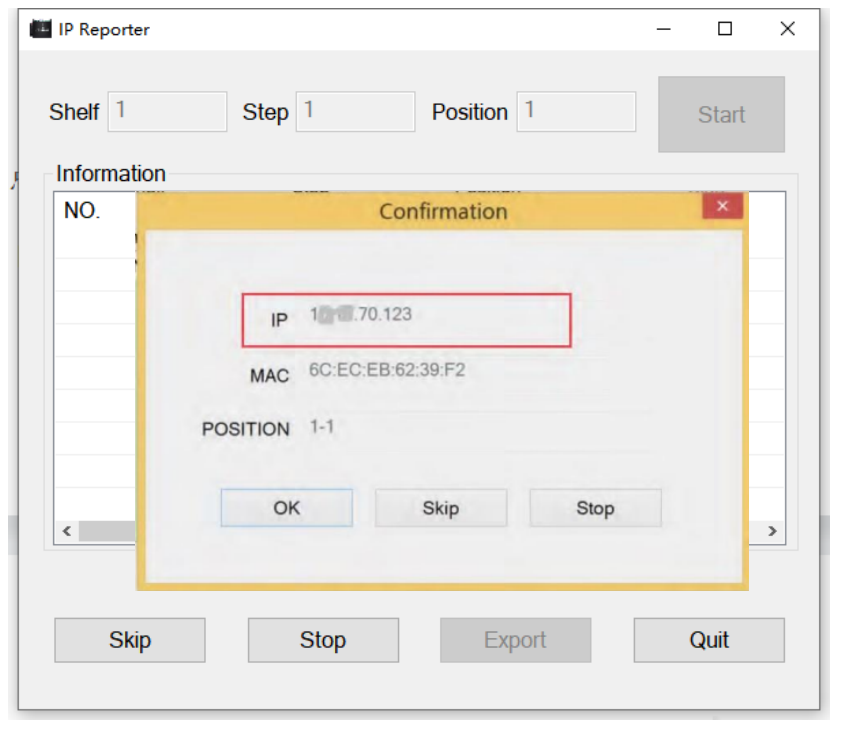
- Open “IP Reporter” and click on the “Start” button.
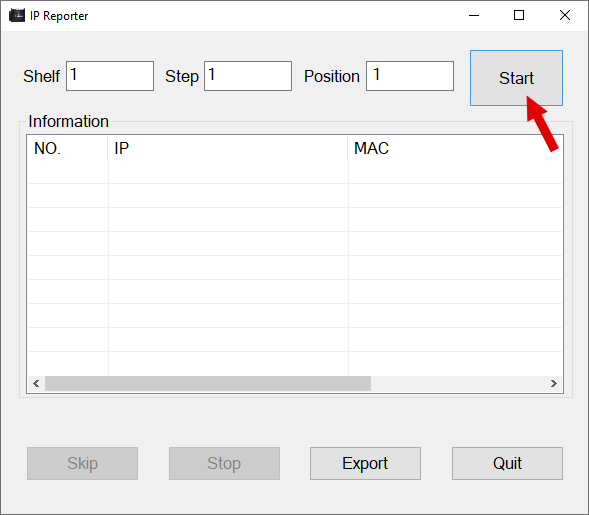
- The IP and MAC Addresses of the ASIC will appear.
Step 3: Accessing the Configuration Interface
- Launch a fresh browser window and input the IP Address of your ASIC.

- This pop-up window will open.
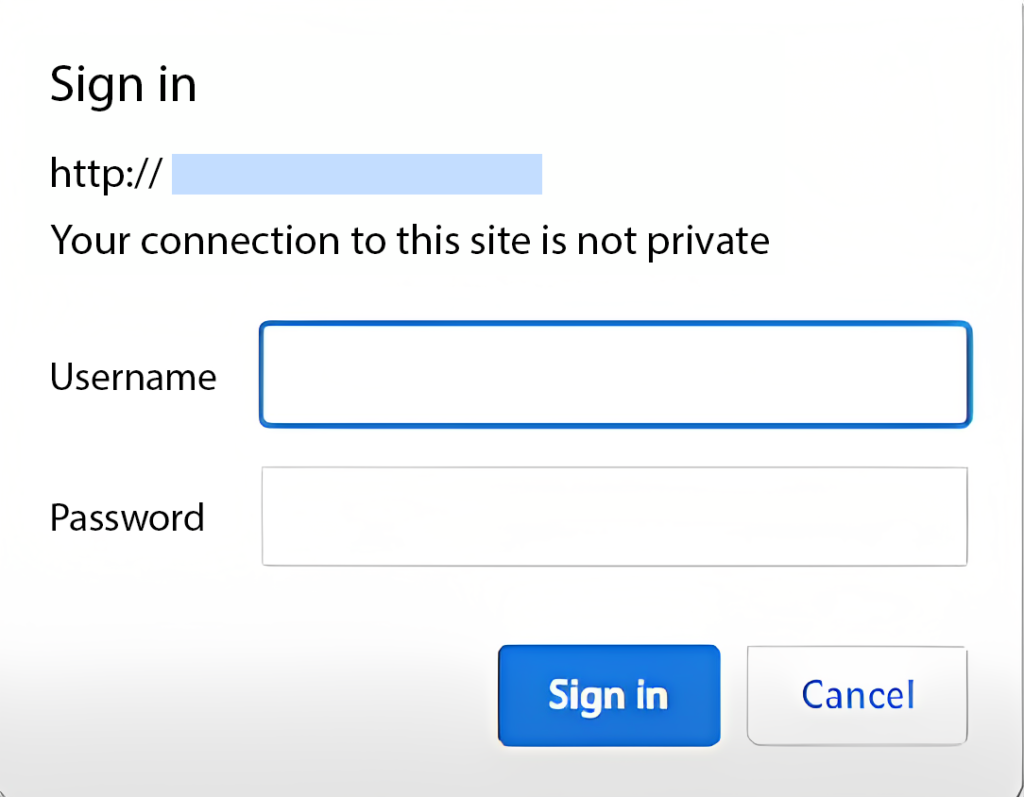
- Utilize the default Username and Password: root.
- It will then open your ANTMINER Dashboard.
Step 4: Updating the Firmware
- Now we’re gonna make sure you have the latest firmware for your ASIC.
- Return to the Bitmain website, navigate to the “Customer Support” section, and then proceed to the “Firmware Download” page.
- Under the “Firmware list” section, choose “ETH/ETC Ethash” from the left-hand side, and then opt for “ANTMINER E9 Pro” on the right-hand side.
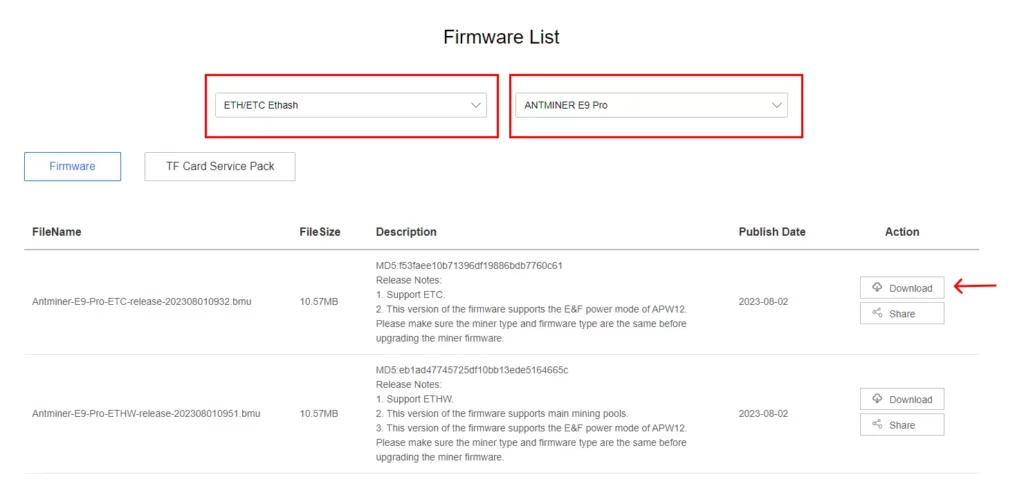
- Download the .bmu file.
- Return to your ANTMINER Dashboard.
- Select “System” and then “Firmware upgrade”.
- Drag the previously downloaded .bmu file to perform the update on your miner.
- If you encounter the message “PAGE DOESN’T EXIST” on your screen, there’s no need to worry, it simply indicates that your ASIC is rebooting.
Step 5: Configuring Mining Pools
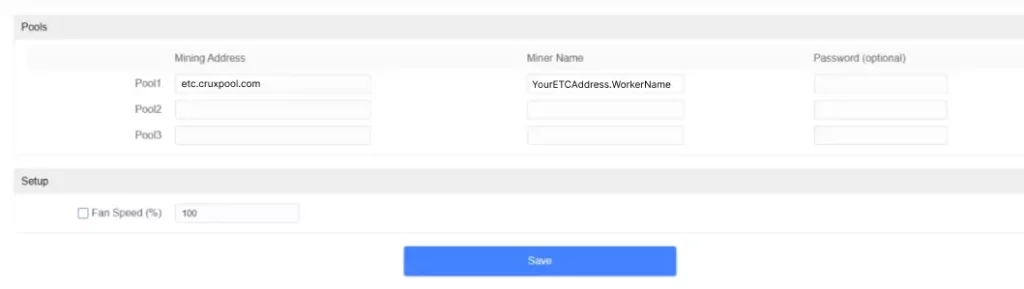
- Navigate back to the main dashboard menu and access the “Settings” menu situated on the left side of the interface
- You are now able to input the required information into the vacant fields in order to establish a connection with the mining pool.
Miner name:
- For anonymous miners: Input your wallet address along with the selected name for your worker, following the format YourETCAddress.WorkerName (e.g. btc123abc456edf789ghj.S19jPRO1).
- For registered miners: Input your Cruxpool account name and the desired name for your worker, following to the format CruxpoolAccountName.WorkerName (e.g. cruxpool.S19jPRO).
Now your Antminer E9 Pro is ready to use!
Performance of the Antminer E9 Pro
The Antminer E9 PRO is designed to leverage the Ethash algorithm, making it ideal for mining Ethereum Classic. It stands out with its impressive ability to provide exceptional hashrates, reaching up to 3680MH/s. This level of processing power positions it as one of the most high-performance ASIC miners in the current market.
A particularly appealing aspect of the Antminer E9 PRO is its remarkable energy efficiency. This ASIC only consumes 2200W of energy, making it a smart choice for those seeking an optimal balance between performance and operational costs. Undoubtedly, this feature makes it one of the most energy-efficient ASIC miners in terms of hashrate provided compared to energy consumption.
However, it’s important to note that due to its processing power and energy consumption, the Antminer E9 PRO can generate considerable heat levels and produce noticeable noise (75db on average). Therefore, using it in a home setting could pose challenges unless you have an appropriate space to mitigate the noise and manage the generated heat.
Overclocking the Antminer E9 Pro
Overclocking ASIC miners presents an enticing prospect for enhancing hash rates and subsequently boosting mining profitability. However, it’s imperative to acknowledge the potential trade-offs that come with this practice. While overclocking can yield improved performance, it also introduces concerns such as escalated power consumption, heightened operating temperatures, and the risk of diminishing the miner’s overall lifespan. A crucial point to bear in mind is that embarking on the overclocking journey could nullify the warranty and even culminate in irreversible hardware impairment. Hence, any attempt at overclocking should be approached with the utmost caution, ensuring adherence to established safety margins.
In the process of overclocking ASIC miners, the adoption of reputable firmware becomes non-negotiable, alongside a steadfast adherence to the manufacturer’s stipulated guidelines. Notably, some mining hardware manufacturers extend official tools and instructions for the purpose of overclocking, effectively minimizing the associated risks. Prudent steps before undertaking this endeavor include verifying efficient cooling and ventilation mechanisms. The rise in power consumption and temperatures could potentially trigger overheating issues, a precarious scenario that could result in hardware breakdown.
Overclocking your ASIC will boost power, but don’t forget that the choice of mining pool is also one of the most important choices when it comes to performance. Finding the best ETC mining pool is therefore also an important step in your journey.
The Value of the Antminer E9 Pro
The Bitmain Antminer E9 Pro holds significant value in the world of cryptocurrency mining. With its impressive hashrate and power efficiency, this ASIC miner offers the potential for substantial mining rewards. It’s worth noting that the Antminer E9 Pro presents a compelling alternative to the expensive options available in the market, such as the Jasminer X-16P, which can cost close to $10,000. This makes the E9 Pro an attractive choice for miners looking to achieve profitable results.
Monitoring and Optimization
Regularly check the dashboard of the Antminer’s web GUI to monitor its performance, including hashrate, power consumption, and temperature. Additionally, consider implementing proper cooling solutions to prevent overheating and maintain optimal performance.
Conclusion
Setting up the Bitmain Antminer E9 Pro for mining is an exciting step toward cryptocurrency mining success. By following this step-by-step guide, you’ve learned how to unbox, configure, and optimize your mining rig for efficient operation. As you embark on your mining journey, remember to stay informed about updates and best practices to make the most of your investment in this powerful ASIC miner.
Now if you want to join a mining pool with good performance and a dedicated support, join us on the best ETC mining pool!